Content
Unlocking the Power of AI Automation: A Beginner's Guide
Unlocking the Power of AI Automation: A Beginner's Guide
Unlocking the Power of AI Automation: A Beginner's Guide
Danny Roman
November 11, 2024



Ready to automate your tasks and unleash the power of AI? This guide will walk you through a simple, yet effective, three-step automation process using ChatGPT and Zapier, enabling you to generate email subject lines effortlessly. Let’s dive in and transform your workflow!
🤖 Introduction to AI Automation
Welcome to the future of productivity! AI automation is not just a buzzword; it's a game-changer for anyone looking to streamline their workflow. Imagine having a reliable assistant that works tirelessly, 24/7, handling repetitive tasks while you focus on what truly matters—growing your business.
Whether you're a solopreneur, a small business owner, or part of a larger team, AI automation tools like Zapier and ChatGPT can help you achieve efficiency like never before. You’ll be able to create complex automations without writing a single line of code. Exciting, right? Let’s dive in!
What Can AI Automation Do For You?
Save Time: Automate mundane tasks, freeing up precious hours in your day.
Increase Accuracy: Reduce human error by letting AI handle repetitive processes.
Boost Creativity: Spend more time on strategic thinking and creativity instead of on the grind.
With the right setup, you can have your AI work for you, generating leads, managing emails, and even creating content. The possibilities are endless!
🔧 Understanding Zapier: Your No-Code Automation Tool
Zapier is the cornerstone of no-code automation. It connects your favorite apps and services, allowing them to work together seamlessly. Think of it as a bridge that links different platforms, making them communicate without any coding skills required.
Signing up is a breeze. Just head over to Zapier.com, create an account, and you’re ready to roll! With over 5,000 apps to choose from, you can automate virtually any task you can think of.
Why Choose Zapier?
User-Friendly: Intuitive interface that allows anyone to set up automations quickly.
Versatile: Connects with thousands of apps, from Google Drive to Slack.
Customizable: Tailor your automations to fit your unique workflow.
Zapier takes the complexity out of automation, allowing you to focus on what you do best. Let’s get into the nitty-gritty of creating your first zap!
🚀 Creating Your Zap: The Automation Setup
Creating a zap is as easy as pie! Once you’re logged into your Zapier account, just click on “Create Zap.” This is where the magic begins. You’ll be guided through a series of steps to set up your automation, starting with identifying the trigger.
The trigger is the event that starts your automation. For example, you might want to trigger an action every time a new email arrives or when a file is added to a specific folder. Let’s see how this works in practice!

Steps to Create Your Zap
Select Your Trigger: Choose an app and the specific event that will initiate your zap.
Set Up Your Trigger: Connect your account and specify any necessary details.
Choose Your Action: Decide what happens when the trigger occurs—this could be sending an email, creating a file, etc.
Remember, the beauty of Zapier lies in its simplicity. You don’t need to be a tech wizard to set up automations that will transform your workflow!
⚡ The Concept of Triggers: Setting Things in Motion
Triggers are the heartbeat of your automation. Think of them as the domino that starts a chain reaction. When a specific event occurs, it signals Zapier to spring into action and execute the tasks you’ve set up.
For instance, if you decide to use Dropbox as your trigger app, the automation can be set to activate every time a new file is added to a designated folder. This means no more manual checking; your zap will do the work for you!

Types of Triggers
New File: Trigger an action when a new file is added.
New Email: Activate when a new email arrives in your inbox.
Form Submission: Start an automation when a form is filled out.
By understanding how triggers work, you can create powerful automations that save time and enhance productivity. Let’s move on to selecting your trigger app!
📂 Choosing Your Trigger App: Dropbox Setup
Dropbox is a fantastic option for triggers because it’s user-friendly and widely used. To set up Dropbox as your trigger app, you’ll first need to connect your Dropbox account to Zapier. Once connected, you can specify which folder you’d like to monitor for new files.
Let's say you create a folder called "Drop Zone emails." Every time you drop a new email file into this folder, your zap will automatically spring into action. Talk about efficiency!

Setting Up Your Dropbox Trigger
Connect Your Account: Link your Dropbox account to Zapier.
Select the Folder: Choose the specific folder you want to monitor.
Test Your Trigger: Make sure everything is set up correctly by testing the trigger.
This setup will ensure that whenever you add a file to the "Drop Zone emails" folder, your automation will kick in without a hitch!
🔍 Testing Your Trigger: Ensuring It Works
Once you’ve set up your trigger, it’s essential to test it. This step ensures that your zap is functioning as expected. After all, the last thing you want is to set up an automation only to find out it doesn’t work!
To test your trigger, simply add a sample file to your designated Dropbox folder and head back to Zapier. Click on the test button, and if everything is set up correctly, you should see your new file recognized by the system.

Why Testing Matters
Confidence: Knowing your automation works means peace of mind.
Efficiency: Identify and fix issues before they become problems.
Optimization: Fine-tune your setup for maximum effectiveness.
Once your trigger is tested and confirmed, you’re ready to move on to adding actions to your zap. Let’s keep the momentum going!
🔍 Understanding Actions: What Happens Next
Now that you've set your trigger, it’s time to dive into the action part of your zap. Actions are what happen after your trigger kicks in. Think of them as the series of responses that will occur once your automation is activated. This is where the real magic happens!
In our case, after a new file is dropped into the "Drop Zone emails" folder, we’ll add actions to utilize ChatGPT for generating email subject lines and then save those results. Let's break this down further.
What Are Actions?
Sequential Tasks: Actions are executed in the order you set them up. Each task is a step in your automation.
Multiple Actions: You can add as many actions as you need, allowing for complex workflows that cater to your unique needs.
Integration: Actions can integrate with various applications, enabling seamless data handling and processing.
With this understanding, you’ll be ready to craft your prompt for ChatGPT and save the generated content in a way that suits your workflow!
🛠 Integrating ChatGPT: Crafting Your Prompt
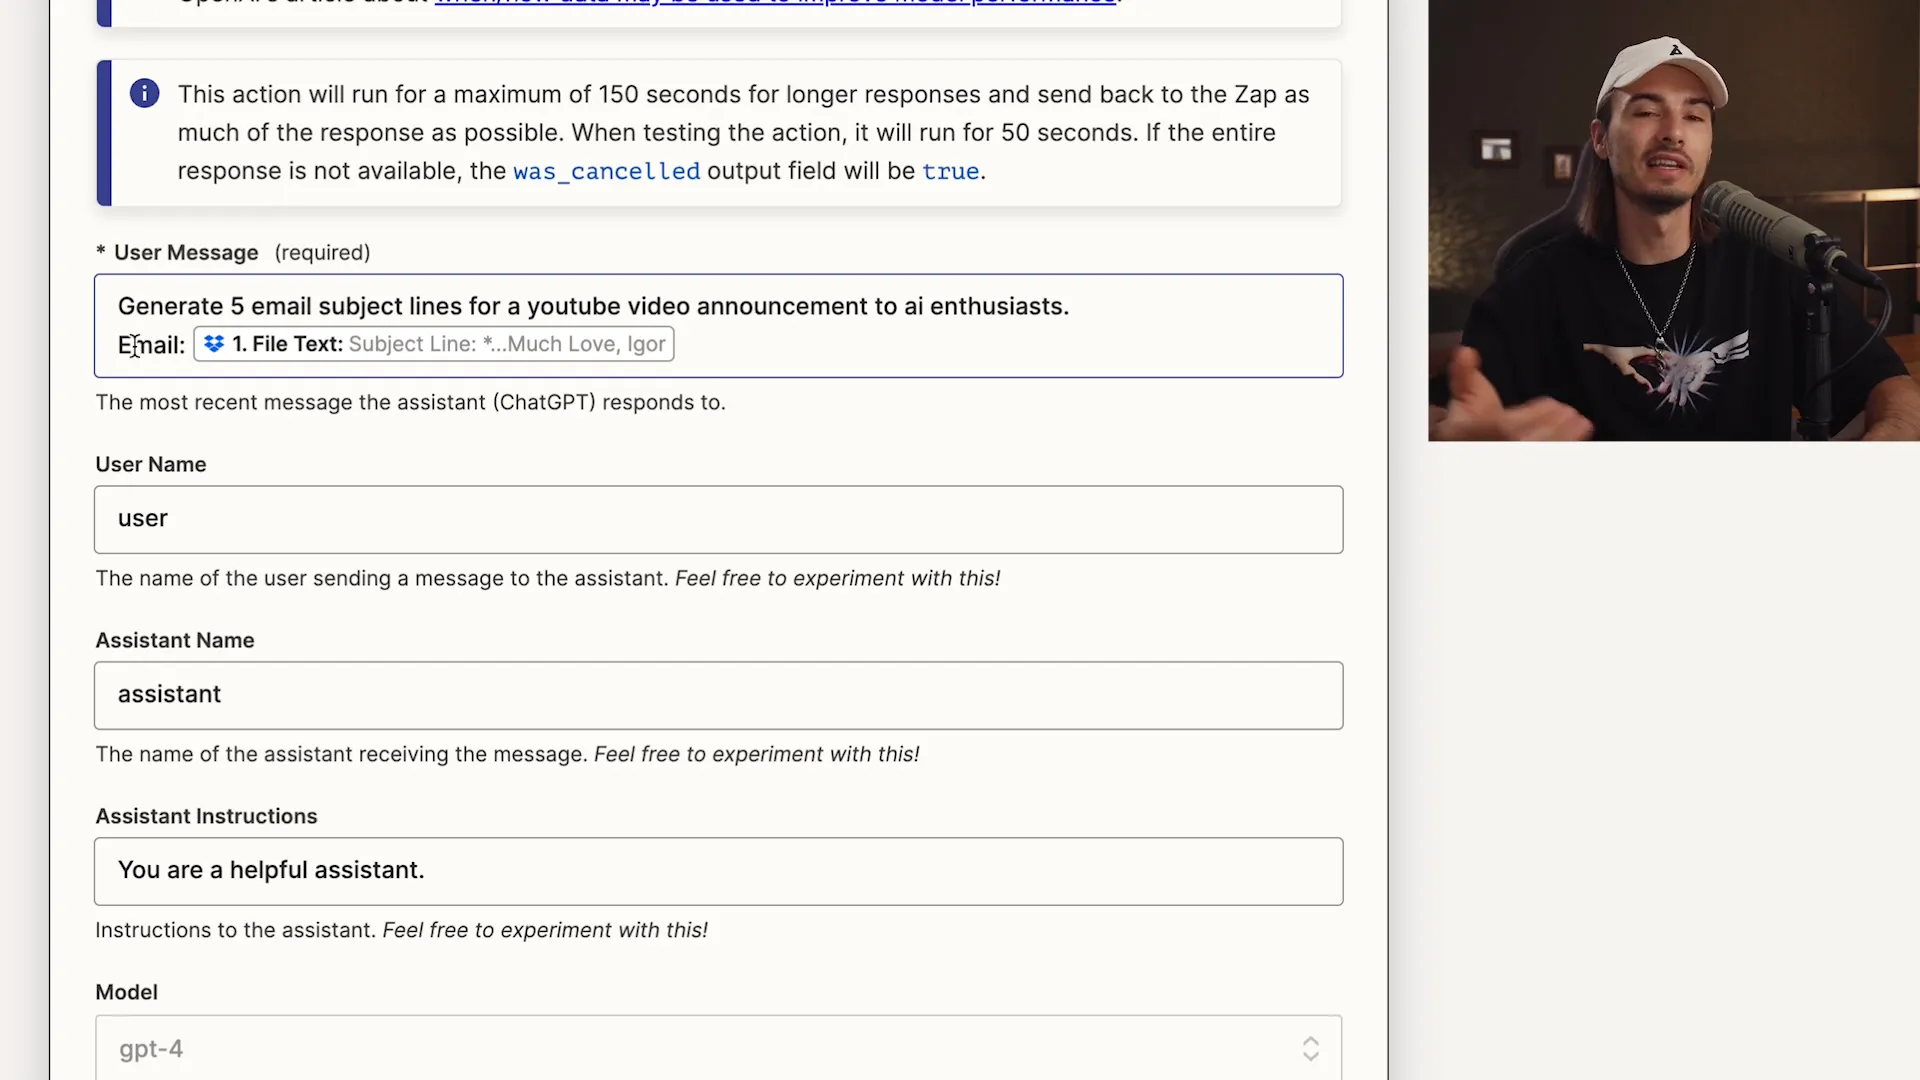
Now we’re getting to the fun part—integrating ChatGPT! This is where you’ll craft a prompt that tells the AI exactly what you need. A well-structured prompt is crucial for getting the best results. Let’s dive into how to do this effectively!
Your prompt should be clear, concise, and specific. The better your prompt, the better your output. In this instance, we want ChatGPT to generate five compelling email subject lines. Here’s how to set it up:
Steps to Craft Your Prompt
Choose the Right Model: Select GPT-4 for optimal results.
Define Your Task: Clearly state what you want ChatGPT to do. For example, "Generate five email subject lines for a YouTube video announcement."
Incorporate Input: Use the content from the previous step as context for your prompt. This ensures relevance and accuracy.
By following these steps, you’ll create a prompt that not only meets your needs but also leverages the full potential of ChatGPT!
💾 Saving the Results: Where to Store Generated Content
After generating those catchy subject lines, the next step is to save the results. You want to ensure that your hard work doesn’t go to waste, right? Here’s how you can effectively store your generated content.
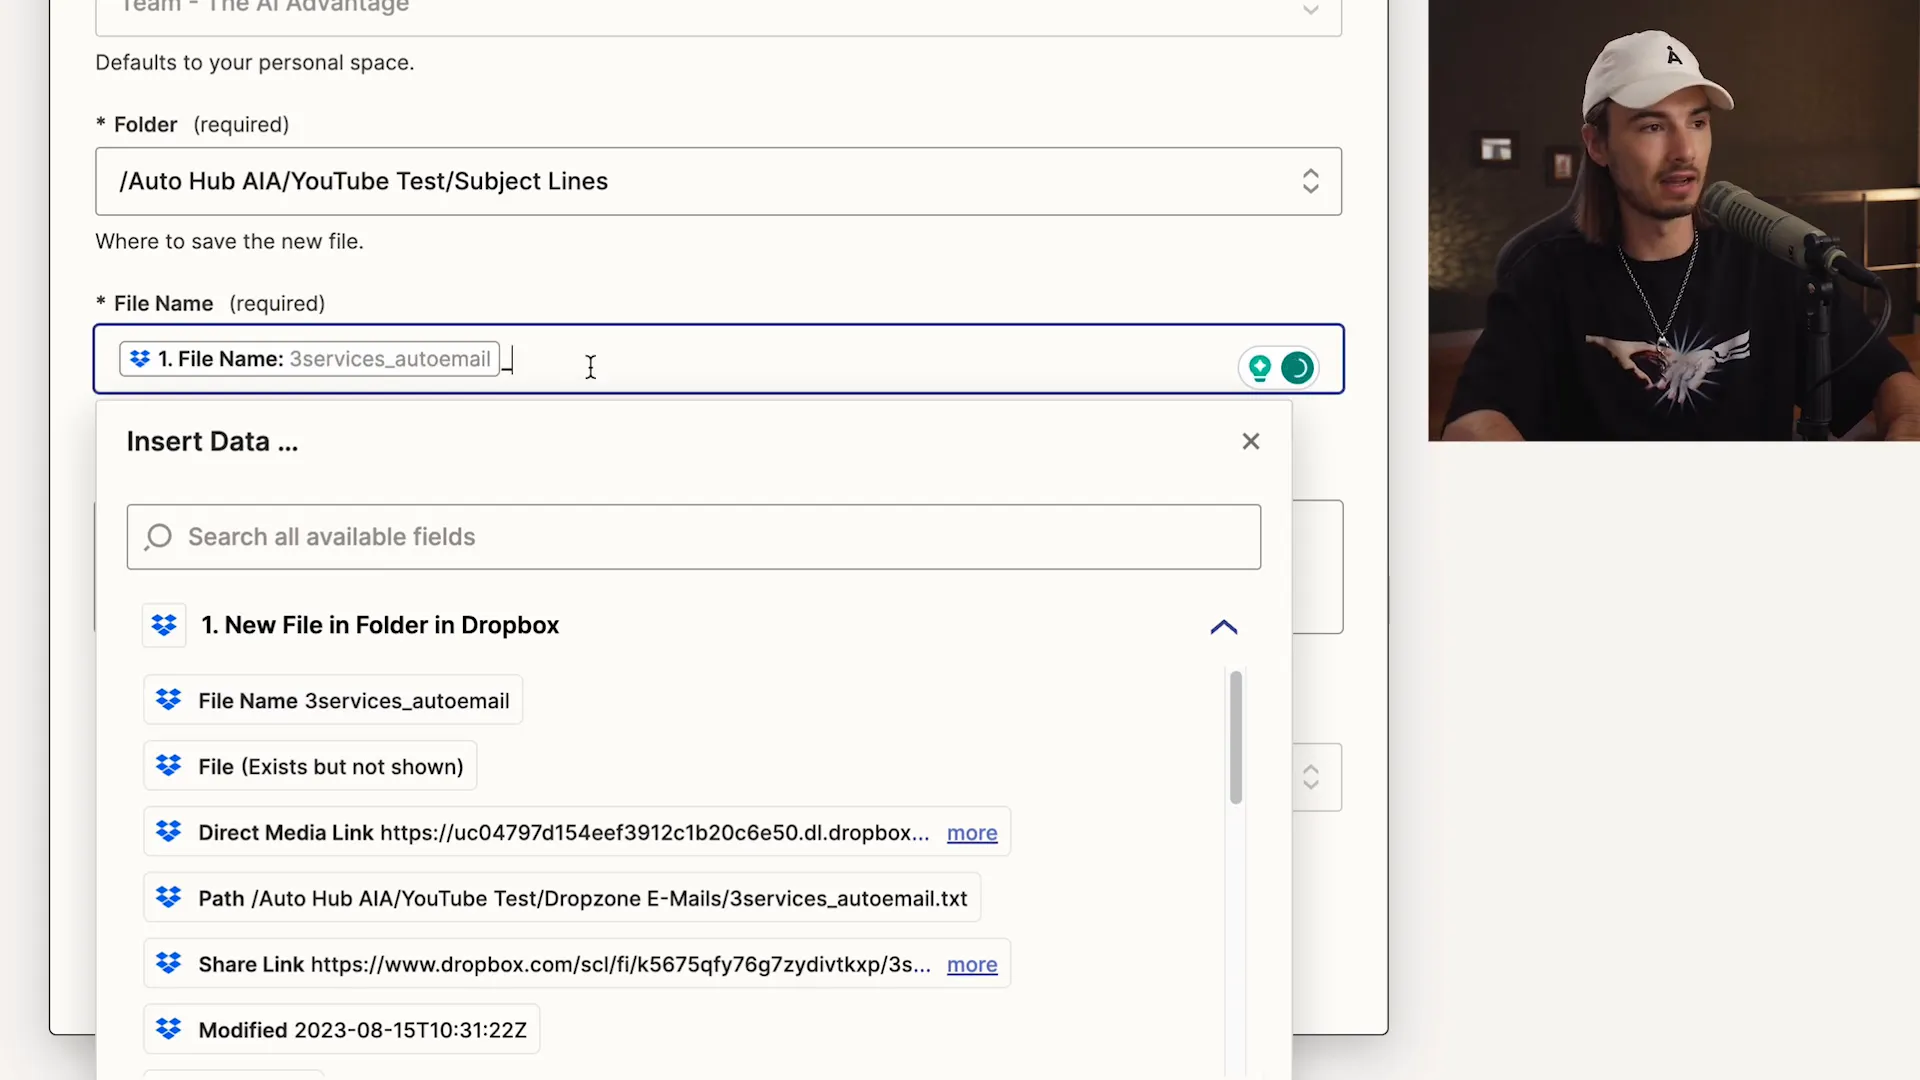
In our automation, we'll save the output to a designated folder in Dropbox. This way, you can access it anytime without hassle. Let’s break down the saving process:
How to Save Your Generated Content
Select Your Storage App: Choose Dropbox as your storage solution.
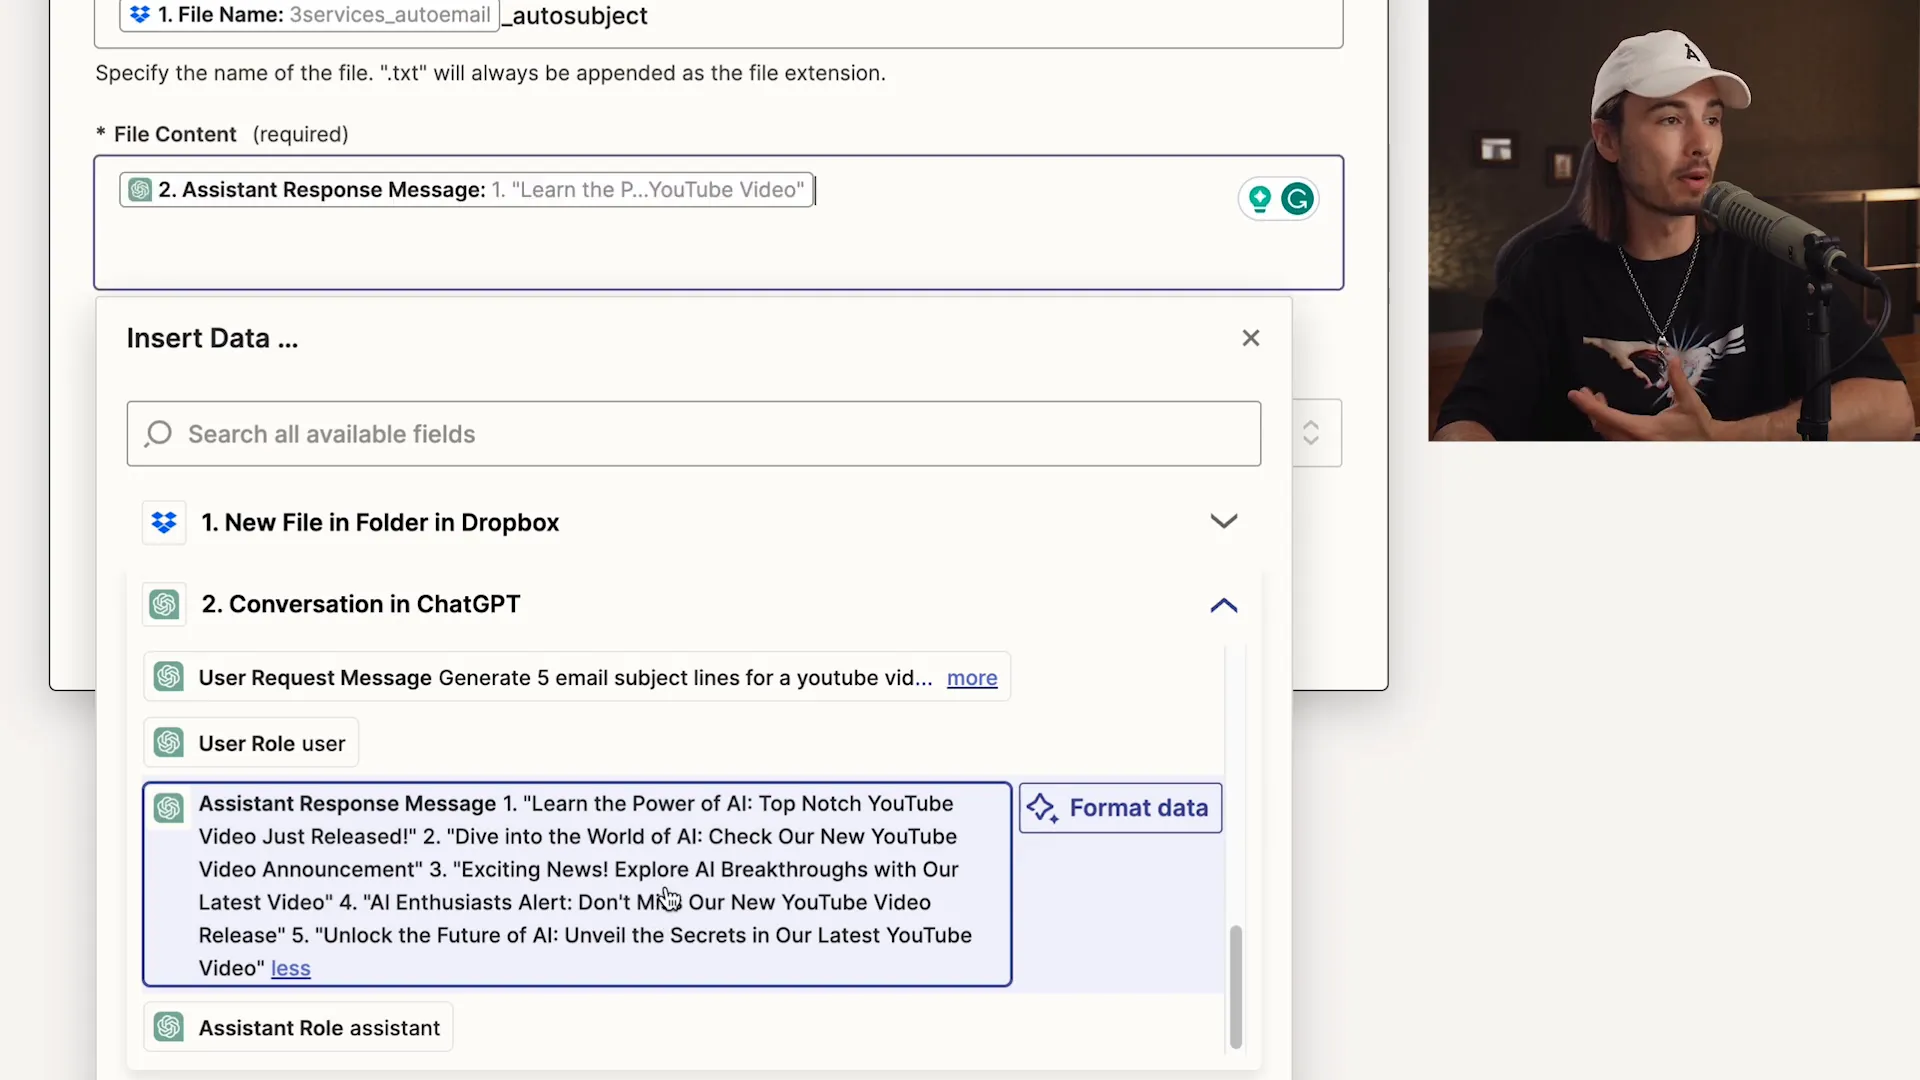
Define File Name and Content: Create a meaningful file name that reflects the content, like "original_filename_auto_subject.txt."
Choose the Folder: Direct the output to the "subject lines" folder you set up earlier.
By following these steps, you'll have an organized way to keep track of all your generated content, making future reference a breeze!
🚀 Final Steps: Publishing Your Automation
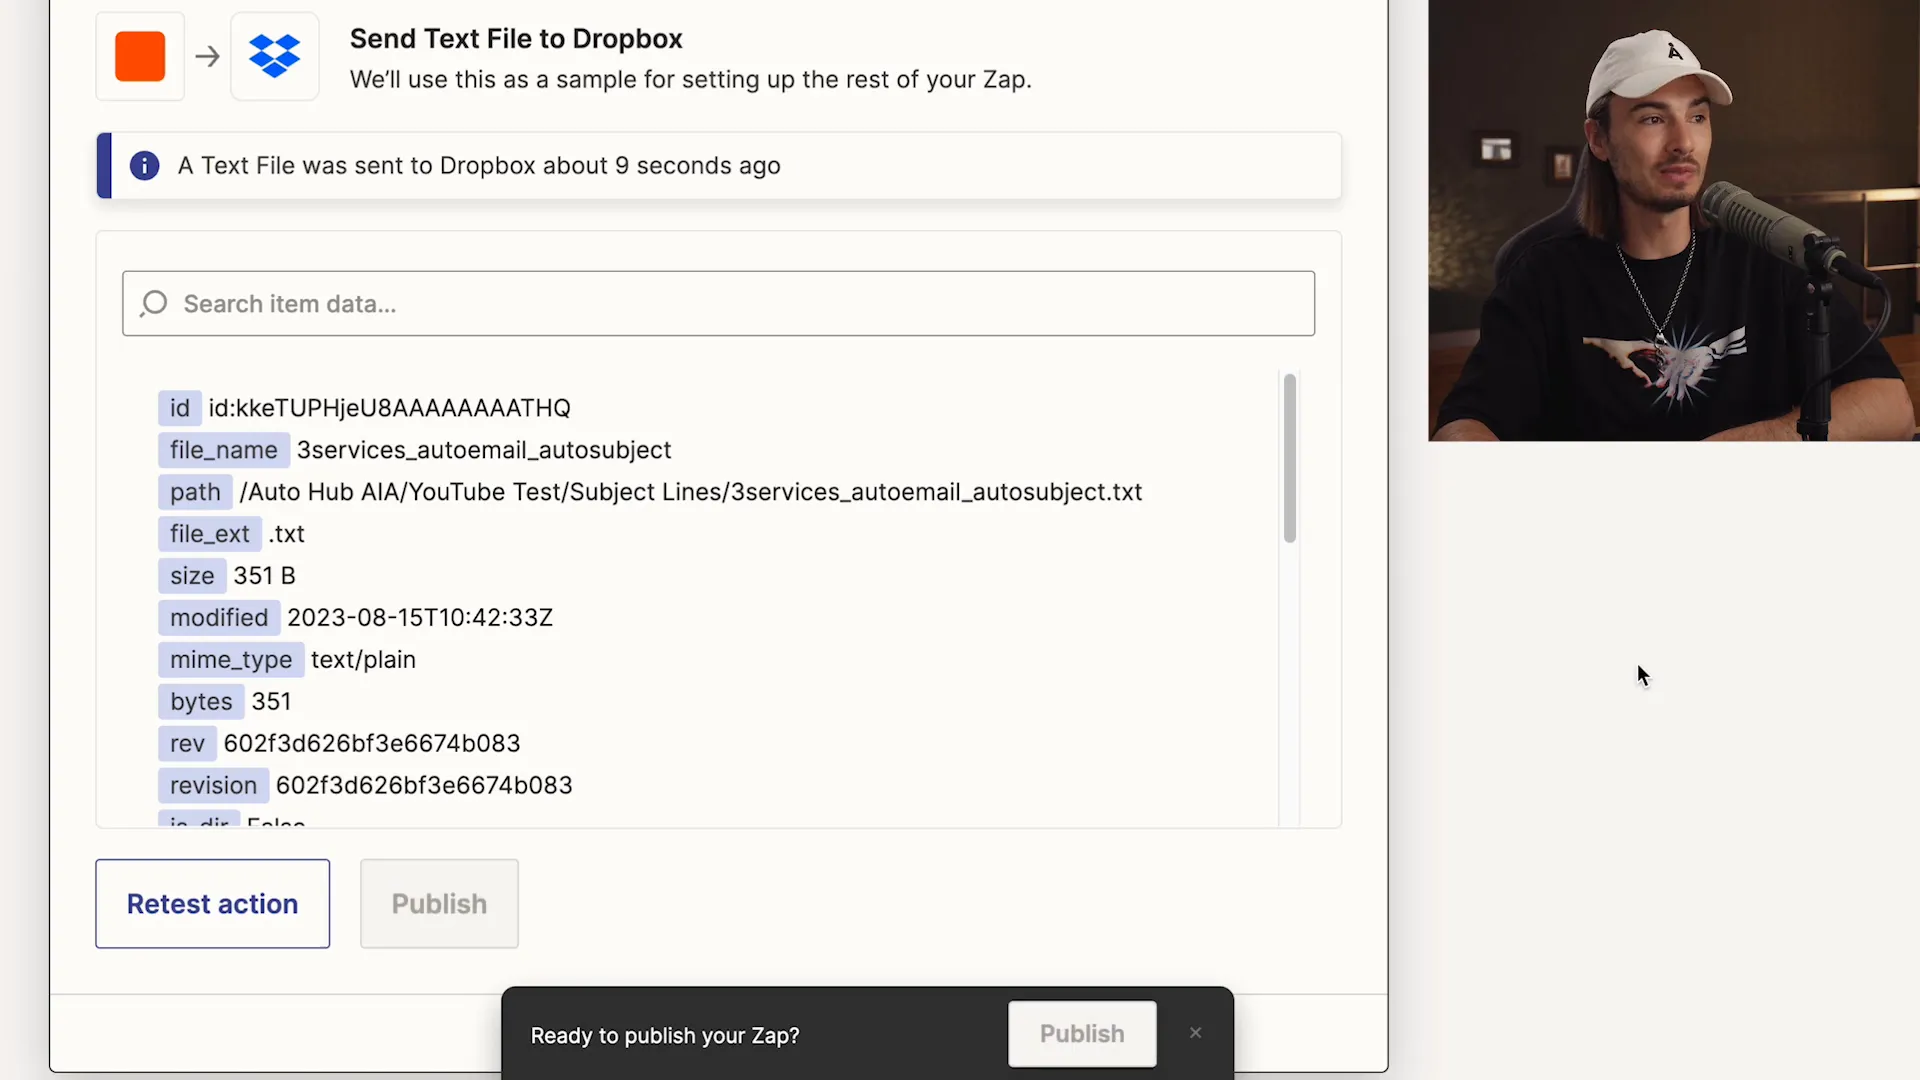
Congratulations! You’re almost at the finish line. After setting up your trigger and actions, the last step is to publish your zap. This makes your automation live and ready to work for you 24/7. Let’s wrap this up!
Publishing your automation is straightforward. Just click the "Publish" button in Zapier, and voila! Your zap is now active. It will automatically run every time the trigger condition is met.
What Happens After Publishing?
Continuous Operation: Your zap will run in the background, processing tasks as they arise.
Monitoring: Keep an eye on your zap’s performance in the dashboard to ensure everything is running smoothly.
Adjustments: Don’t hesitate to tweak your actions or prompts as needed for improved results.
With your automation live, you can now focus on what you do best while the system handles the repetitive tasks.
🔧 Customization and Future Automations
Now that you’ve set up your first automation, the sky's the limit! Customization is key to making your workflows as efficient as possible. Here’s how to take your automation game to the next level.
Zapier allows you to choose from thousands of apps, giving you the flexibility to create unique automations tailored to your needs. Here are some ideas for future projects:
Ideas for Future Automations
Social Media Posts: Automatically post updates whenever you publish new content.
Lead Generation: Capture leads from forms and send them directly to your CRM.
Customer Follow-ups: Set reminders for follow-up emails based on customer interactions.
By exploring these ideas, you can continuously enhance your productivity and streamline your workflows! Remember, automation is all about working smarter, not harder.
Ready to automate your tasks and unleash the power of AI? This guide will walk you through a simple, yet effective, three-step automation process using ChatGPT and Zapier, enabling you to generate email subject lines effortlessly. Let’s dive in and transform your workflow!
🤖 Introduction to AI Automation
Welcome to the future of productivity! AI automation is not just a buzzword; it's a game-changer for anyone looking to streamline their workflow. Imagine having a reliable assistant that works tirelessly, 24/7, handling repetitive tasks while you focus on what truly matters—growing your business.
Whether you're a solopreneur, a small business owner, or part of a larger team, AI automation tools like Zapier and ChatGPT can help you achieve efficiency like never before. You’ll be able to create complex automations without writing a single line of code. Exciting, right? Let’s dive in!
What Can AI Automation Do For You?
Save Time: Automate mundane tasks, freeing up precious hours in your day.
Increase Accuracy: Reduce human error by letting AI handle repetitive processes.
Boost Creativity: Spend more time on strategic thinking and creativity instead of on the grind.
With the right setup, you can have your AI work for you, generating leads, managing emails, and even creating content. The possibilities are endless!
🔧 Understanding Zapier: Your No-Code Automation Tool
Zapier is the cornerstone of no-code automation. It connects your favorite apps and services, allowing them to work together seamlessly. Think of it as a bridge that links different platforms, making them communicate without any coding skills required.
Signing up is a breeze. Just head over to Zapier.com, create an account, and you’re ready to roll! With over 5,000 apps to choose from, you can automate virtually any task you can think of.

Why Choose Zapier?
User-Friendly: Intuitive interface that allows anyone to set up automations quickly.
Versatile: Connects with thousands of apps, from Google Drive to Slack.
Customizable: Tailor your automations to fit your unique workflow.
Zapier takes the complexity out of automation, allowing you to focus on what you do best. Let’s get into the nitty-gritty of creating your first zap!
🚀 Creating Your Zap: The Automation Setup
Creating a zap is as easy as pie! Once you’re logged into your Zapier account, just click on “Create Zap.” This is where the magic begins. You’ll be guided through a series of steps to set up your automation, starting with identifying the trigger.
The trigger is the event that starts your automation. For example, you might want to trigger an action every time a new email arrives or when a file is added to a specific folder. Let’s see how this works in practice!

Steps to Create Your Zap
Select Your Trigger: Choose an app and the specific event that will initiate your zap.
Set Up Your Trigger: Connect your account and specify any necessary details.
Choose Your Action: Decide what happens when the trigger occurs—this could be sending an email, creating a file, etc.
Remember, the beauty of Zapier lies in its simplicity. You don’t need to be a tech wizard to set up automations that will transform your workflow!
⚡ The Concept of Triggers: Setting Things in Motion
Triggers are the heartbeat of your automation. Think of them as the domino that starts a chain reaction. When a specific event occurs, it signals Zapier to spring into action and execute the tasks you’ve set up.
For instance, if you decide to use Dropbox as your trigger app, the automation can be set to activate every time a new file is added to a designated folder. This means no more manual checking; your zap will do the work for you!

Types of Triggers
New File: Trigger an action when a new file is added.
New Email: Activate when a new email arrives in your inbox.
Form Submission: Start an automation when a form is filled out.
By understanding how triggers work, you can create powerful automations that save time and enhance productivity. Let’s move on to selecting your trigger app!
📂 Choosing Your Trigger App: Dropbox Setup
Dropbox is a fantastic option for triggers because it’s user-friendly and widely used. To set up Dropbox as your trigger app, you’ll first need to connect your Dropbox account to Zapier. Once connected, you can specify which folder you’d like to monitor for new files.
Let's say you create a folder called "Drop Zone emails." Every time you drop a new email file into this folder, your zap will automatically spring into action. Talk about efficiency!

Setting Up Your Dropbox Trigger
Connect Your Account: Link your Dropbox account to Zapier.
Select the Folder: Choose the specific folder you want to monitor.
Test Your Trigger: Make sure everything is set up correctly by testing the trigger.
This setup will ensure that whenever you add a file to the "Drop Zone emails" folder, your automation will kick in without a hitch!
🔍 Testing Your Trigger: Ensuring It Works
Once you’ve set up your trigger, it’s essential to test it. This step ensures that your zap is functioning as expected. After all, the last thing you want is to set up an automation only to find out it doesn’t work!
To test your trigger, simply add a sample file to your designated Dropbox folder and head back to Zapier. Click on the test button, and if everything is set up correctly, you should see your new file recognized by the system.

Why Testing Matters
Confidence: Knowing your automation works means peace of mind.
Efficiency: Identify and fix issues before they become problems.
Optimization: Fine-tune your setup for maximum effectiveness.
Once your trigger is tested and confirmed, you’re ready to move on to adding actions to your zap. Let’s keep the momentum going!
🔍 Understanding Actions: What Happens Next
Now that you've set your trigger, it’s time to dive into the action part of your zap. Actions are what happen after your trigger kicks in. Think of them as the series of responses that will occur once your automation is activated. This is where the real magic happens!
In our case, after a new file is dropped into the "Drop Zone emails" folder, we’ll add actions to utilize ChatGPT for generating email subject lines and then save those results. Let's break this down further.
What Are Actions?
Sequential Tasks: Actions are executed in the order you set them up. Each task is a step in your automation.
Multiple Actions: You can add as many actions as you need, allowing for complex workflows that cater to your unique needs.
Integration: Actions can integrate with various applications, enabling seamless data handling and processing.
With this understanding, you’ll be ready to craft your prompt for ChatGPT and save the generated content in a way that suits your workflow!

🛠 Integrating ChatGPT: Crafting Your Prompt
Now we’re getting to the fun part—integrating ChatGPT! This is where you’ll craft a prompt that tells the AI exactly what you need. A well-structured prompt is crucial for getting the best results. Let’s dive into how to do this effectively!
Your prompt should be clear, concise, and specific. The better your prompt, the better your output. In this instance, we want ChatGPT to generate five compelling email subject lines. Here’s how to set it up:
Steps to Craft Your Prompt
Choose the Right Model: Select GPT-4 for optimal results.
Define Your Task: Clearly state what you want ChatGPT to do. For example, "Generate five email subject lines for a YouTube video announcement."
Incorporate Input: Use the content from the previous step as context for your prompt. This ensures relevance and accuracy.
By following these steps, you’ll create a prompt that not only meets your needs but also leverages the full potential of ChatGPT!

💾 Saving the Results: Where to Store Generated Content
After generating those catchy subject lines, the next step is to save the results. You want to ensure that your hard work doesn’t go to waste, right? Here’s how you can effectively store your generated content.
In our automation, we'll save the output to a designated folder in Dropbox. This way, you can access it anytime without hassle. Let’s break down the saving process:
How to Save Your Generated Content
Select Your Storage App: Choose Dropbox as your storage solution.
Define File Name and Content: Create a meaningful file name that reflects the content, like "original_filename_auto_subject.txt."
Choose the Folder: Direct the output to the "subject lines" folder you set up earlier.
By following these steps, you'll have an organized way to keep track of all your generated content, making future reference a breeze!

🚀 Final Steps: Publishing Your Automation
Congratulations! You’re almost at the finish line. After setting up your trigger and actions, the last step is to publish your zap. This makes your automation live and ready to work for you 24/7. Let’s wrap this up!
Publishing your automation is straightforward. Just click the "Publish" button in Zapier, and voila! Your zap is now active. It will automatically run every time the trigger condition is met.
What Happens After Publishing?
Continuous Operation: Your zap will run in the background, processing tasks as they arise.
Monitoring: Keep an eye on your zap’s performance in the dashboard to ensure everything is running smoothly.
Adjustments: Don’t hesitate to tweak your actions or prompts as needed for improved results.
With your automation live, you can now focus on what you do best while the system handles the repetitive tasks.

🔧 Customization and Future Automations
Now that you’ve set up your first automation, the sky's the limit! Customization is key to making your workflows as efficient as possible. Here’s how to take your automation game to the next level.
Zapier allows you to choose from thousands of apps, giving you the flexibility to create unique automations tailored to your needs. Here are some ideas for future projects:
Ideas for Future Automations
Social Media Posts: Automatically post updates whenever you publish new content.
Lead Generation: Capture leads from forms and send them directly to your CRM.
Customer Follow-ups: Set reminders for follow-up emails based on customer interactions.
By exploring these ideas, you can continuously enhance your productivity and streamline your workflows! Remember, automation is all about working smarter, not harder.
Ready to automate your tasks and unleash the power of AI? This guide will walk you through a simple, yet effective, three-step automation process using ChatGPT and Zapier, enabling you to generate email subject lines effortlessly. Let’s dive in and transform your workflow!
🤖 Introduction to AI Automation
Welcome to the future of productivity! AI automation is not just a buzzword; it's a game-changer for anyone looking to streamline their workflow. Imagine having a reliable assistant that works tirelessly, 24/7, handling repetitive tasks while you focus on what truly matters—growing your business.
Whether you're a solopreneur, a small business owner, or part of a larger team, AI automation tools like Zapier and ChatGPT can help you achieve efficiency like never before. You’ll be able to create complex automations without writing a single line of code. Exciting, right? Let’s dive in!
What Can AI Automation Do For You?
Save Time: Automate mundane tasks, freeing up precious hours in your day.
Increase Accuracy: Reduce human error by letting AI handle repetitive processes.
Boost Creativity: Spend more time on strategic thinking and creativity instead of on the grind.
With the right setup, you can have your AI work for you, generating leads, managing emails, and even creating content. The possibilities are endless!
🔧 Understanding Zapier: Your No-Code Automation Tool
Zapier is the cornerstone of no-code automation. It connects your favorite apps and services, allowing them to work together seamlessly. Think of it as a bridge that links different platforms, making them communicate without any coding skills required.
Signing up is a breeze. Just head over to Zapier.com, create an account, and you’re ready to roll! With over 5,000 apps to choose from, you can automate virtually any task you can think of.

Why Choose Zapier?
User-Friendly: Intuitive interface that allows anyone to set up automations quickly.
Versatile: Connects with thousands of apps, from Google Drive to Slack.
Customizable: Tailor your automations to fit your unique workflow.
Zapier takes the complexity out of automation, allowing you to focus on what you do best. Let’s get into the nitty-gritty of creating your first zap!
🚀 Creating Your Zap: The Automation Setup
Creating a zap is as easy as pie! Once you’re logged into your Zapier account, just click on “Create Zap.” This is where the magic begins. You’ll be guided through a series of steps to set up your automation, starting with identifying the trigger.
The trigger is the event that starts your automation. For example, you might want to trigger an action every time a new email arrives or when a file is added to a specific folder. Let’s see how this works in practice!

Steps to Create Your Zap
Select Your Trigger: Choose an app and the specific event that will initiate your zap.
Set Up Your Trigger: Connect your account and specify any necessary details.
Choose Your Action: Decide what happens when the trigger occurs—this could be sending an email, creating a file, etc.
Remember, the beauty of Zapier lies in its simplicity. You don’t need to be a tech wizard to set up automations that will transform your workflow!
⚡ The Concept of Triggers: Setting Things in Motion
Triggers are the heartbeat of your automation. Think of them as the domino that starts a chain reaction. When a specific event occurs, it signals Zapier to spring into action and execute the tasks you’ve set up.
For instance, if you decide to use Dropbox as your trigger app, the automation can be set to activate every time a new file is added to a designated folder. This means no more manual checking; your zap will do the work for you!

Types of Triggers
New File: Trigger an action when a new file is added.
New Email: Activate when a new email arrives in your inbox.
Form Submission: Start an automation when a form is filled out.
By understanding how triggers work, you can create powerful automations that save time and enhance productivity. Let’s move on to selecting your trigger app!
📂 Choosing Your Trigger App: Dropbox Setup
Dropbox is a fantastic option for triggers because it’s user-friendly and widely used. To set up Dropbox as your trigger app, you’ll first need to connect your Dropbox account to Zapier. Once connected, you can specify which folder you’d like to monitor for new files.
Let's say you create a folder called "Drop Zone emails." Every time you drop a new email file into this folder, your zap will automatically spring into action. Talk about efficiency!

Setting Up Your Dropbox Trigger
Connect Your Account: Link your Dropbox account to Zapier.
Select the Folder: Choose the specific folder you want to monitor.
Test Your Trigger: Make sure everything is set up correctly by testing the trigger.
This setup will ensure that whenever you add a file to the "Drop Zone emails" folder, your automation will kick in without a hitch!
🔍 Testing Your Trigger: Ensuring It Works
Once you’ve set up your trigger, it’s essential to test it. This step ensures that your zap is functioning as expected. After all, the last thing you want is to set up an automation only to find out it doesn’t work!
To test your trigger, simply add a sample file to your designated Dropbox folder and head back to Zapier. Click on the test button, and if everything is set up correctly, you should see your new file recognized by the system.

Why Testing Matters
Confidence: Knowing your automation works means peace of mind.
Efficiency: Identify and fix issues before they become problems.
Optimization: Fine-tune your setup for maximum effectiveness.
Once your trigger is tested and confirmed, you’re ready to move on to adding actions to your zap. Let’s keep the momentum going!
🔍 Understanding Actions: What Happens Next
Now that you've set your trigger, it’s time to dive into the action part of your zap. Actions are what happen after your trigger kicks in. Think of them as the series of responses that will occur once your automation is activated. This is where the real magic happens!
In our case, after a new file is dropped into the "Drop Zone emails" folder, we’ll add actions to utilize ChatGPT for generating email subject lines and then save those results. Let's break this down further.
What Are Actions?
Sequential Tasks: Actions are executed in the order you set them up. Each task is a step in your automation.
Multiple Actions: You can add as many actions as you need, allowing for complex workflows that cater to your unique needs.
Integration: Actions can integrate with various applications, enabling seamless data handling and processing.
With this understanding, you’ll be ready to craft your prompt for ChatGPT and save the generated content in a way that suits your workflow!

🛠 Integrating ChatGPT: Crafting Your Prompt
Now we’re getting to the fun part—integrating ChatGPT! This is where you’ll craft a prompt that tells the AI exactly what you need. A well-structured prompt is crucial for getting the best results. Let’s dive into how to do this effectively!
Your prompt should be clear, concise, and specific. The better your prompt, the better your output. In this instance, we want ChatGPT to generate five compelling email subject lines. Here’s how to set it up:
Steps to Craft Your Prompt
Choose the Right Model: Select GPT-4 for optimal results.
Define Your Task: Clearly state what you want ChatGPT to do. For example, "Generate five email subject lines for a YouTube video announcement."
Incorporate Input: Use the content from the previous step as context for your prompt. This ensures relevance and accuracy.
By following these steps, you’ll create a prompt that not only meets your needs but also leverages the full potential of ChatGPT!

💾 Saving the Results: Where to Store Generated Content
After generating those catchy subject lines, the next step is to save the results. You want to ensure that your hard work doesn’t go to waste, right? Here’s how you can effectively store your generated content.
In our automation, we'll save the output to a designated folder in Dropbox. This way, you can access it anytime without hassle. Let’s break down the saving process:
How to Save Your Generated Content
Select Your Storage App: Choose Dropbox as your storage solution.
Define File Name and Content: Create a meaningful file name that reflects the content, like "original_filename_auto_subject.txt."
Choose the Folder: Direct the output to the "subject lines" folder you set up earlier.
By following these steps, you'll have an organized way to keep track of all your generated content, making future reference a breeze!

🚀 Final Steps: Publishing Your Automation
Congratulations! You’re almost at the finish line. After setting up your trigger and actions, the last step is to publish your zap. This makes your automation live and ready to work for you 24/7. Let’s wrap this up!
Publishing your automation is straightforward. Just click the "Publish" button in Zapier, and voila! Your zap is now active. It will automatically run every time the trigger condition is met.
What Happens After Publishing?
Continuous Operation: Your zap will run in the background, processing tasks as they arise.
Monitoring: Keep an eye on your zap’s performance in the dashboard to ensure everything is running smoothly.
Adjustments: Don’t hesitate to tweak your actions or prompts as needed for improved results.
With your automation live, you can now focus on what you do best while the system handles the repetitive tasks.

🔧 Customization and Future Automations
Now that you’ve set up your first automation, the sky's the limit! Customization is key to making your workflows as efficient as possible. Here’s how to take your automation game to the next level.
Zapier allows you to choose from thousands of apps, giving you the flexibility to create unique automations tailored to your needs. Here are some ideas for future projects:
Ideas for Future Automations
Social Media Posts: Automatically post updates whenever you publish new content.
Lead Generation: Capture leads from forms and send them directly to your CRM.
Customer Follow-ups: Set reminders for follow-up emails based on customer interactions.
By exploring these ideas, you can continuously enhance your productivity and streamline your workflows! Remember, automation is all about working smarter, not harder.
Ready to automate your tasks and unleash the power of AI? This guide will walk you through a simple, yet effective, three-step automation process using ChatGPT and Zapier, enabling you to generate email subject lines effortlessly. Let’s dive in and transform your workflow!
🤖 Introduction to AI Automation
Welcome to the future of productivity! AI automation is not just a buzzword; it's a game-changer for anyone looking to streamline their workflow. Imagine having a reliable assistant that works tirelessly, 24/7, handling repetitive tasks while you focus on what truly matters—growing your business.
Whether you're a solopreneur, a small business owner, or part of a larger team, AI automation tools like Zapier and ChatGPT can help you achieve efficiency like never before. You’ll be able to create complex automations without writing a single line of code. Exciting, right? Let’s dive in!
What Can AI Automation Do For You?
Save Time: Automate mundane tasks, freeing up precious hours in your day.
Increase Accuracy: Reduce human error by letting AI handle repetitive processes.
Boost Creativity: Spend more time on strategic thinking and creativity instead of on the grind.
With the right setup, you can have your AI work for you, generating leads, managing emails, and even creating content. The possibilities are endless!
🔧 Understanding Zapier: Your No-Code Automation Tool
Zapier is the cornerstone of no-code automation. It connects your favorite apps and services, allowing them to work together seamlessly. Think of it as a bridge that links different platforms, making them communicate without any coding skills required.
Signing up is a breeze. Just head over to Zapier.com, create an account, and you’re ready to roll! With over 5,000 apps to choose from, you can automate virtually any task you can think of.

Why Choose Zapier?
User-Friendly: Intuitive interface that allows anyone to set up automations quickly.
Versatile: Connects with thousands of apps, from Google Drive to Slack.
Customizable: Tailor your automations to fit your unique workflow.
Zapier takes the complexity out of automation, allowing you to focus on what you do best. Let’s get into the nitty-gritty of creating your first zap!
🚀 Creating Your Zap: The Automation Setup
Creating a zap is as easy as pie! Once you’re logged into your Zapier account, just click on “Create Zap.” This is where the magic begins. You’ll be guided through a series of steps to set up your automation, starting with identifying the trigger.
The trigger is the event that starts your automation. For example, you might want to trigger an action every time a new email arrives or when a file is added to a specific folder. Let’s see how this works in practice!

Steps to Create Your Zap
Select Your Trigger: Choose an app and the specific event that will initiate your zap.
Set Up Your Trigger: Connect your account and specify any necessary details.
Choose Your Action: Decide what happens when the trigger occurs—this could be sending an email, creating a file, etc.
Remember, the beauty of Zapier lies in its simplicity. You don’t need to be a tech wizard to set up automations that will transform your workflow!
⚡ The Concept of Triggers: Setting Things in Motion
Triggers are the heartbeat of your automation. Think of them as the domino that starts a chain reaction. When a specific event occurs, it signals Zapier to spring into action and execute the tasks you’ve set up.
For instance, if you decide to use Dropbox as your trigger app, the automation can be set to activate every time a new file is added to a designated folder. This means no more manual checking; your zap will do the work for you!

Types of Triggers
New File: Trigger an action when a new file is added.
New Email: Activate when a new email arrives in your inbox.
Form Submission: Start an automation when a form is filled out.
By understanding how triggers work, you can create powerful automations that save time and enhance productivity. Let’s move on to selecting your trigger app!
📂 Choosing Your Trigger App: Dropbox Setup
Dropbox is a fantastic option for triggers because it’s user-friendly and widely used. To set up Dropbox as your trigger app, you’ll first need to connect your Dropbox account to Zapier. Once connected, you can specify which folder you’d like to monitor for new files.
Let's say you create a folder called "Drop Zone emails." Every time you drop a new email file into this folder, your zap will automatically spring into action. Talk about efficiency!

Setting Up Your Dropbox Trigger
Connect Your Account: Link your Dropbox account to Zapier.
Select the Folder: Choose the specific folder you want to monitor.
Test Your Trigger: Make sure everything is set up correctly by testing the trigger.
This setup will ensure that whenever you add a file to the "Drop Zone emails" folder, your automation will kick in without a hitch!
🔍 Testing Your Trigger: Ensuring It Works
Once you’ve set up your trigger, it’s essential to test it. This step ensures that your zap is functioning as expected. After all, the last thing you want is to set up an automation only to find out it doesn’t work!
To test your trigger, simply add a sample file to your designated Dropbox folder and head back to Zapier. Click on the test button, and if everything is set up correctly, you should see your new file recognized by the system.

Why Testing Matters
Confidence: Knowing your automation works means peace of mind.
Efficiency: Identify and fix issues before they become problems.
Optimization: Fine-tune your setup for maximum effectiveness.
Once your trigger is tested and confirmed, you’re ready to move on to adding actions to your zap. Let’s keep the momentum going!
🔍 Understanding Actions: What Happens Next
Now that you've set your trigger, it’s time to dive into the action part of your zap. Actions are what happen after your trigger kicks in. Think of them as the series of responses that will occur once your automation is activated. This is where the real magic happens!
In our case, after a new file is dropped into the "Drop Zone emails" folder, we’ll add actions to utilize ChatGPT for generating email subject lines and then save those results. Let's break this down further.
What Are Actions?
Sequential Tasks: Actions are executed in the order you set them up. Each task is a step in your automation.
Multiple Actions: You can add as many actions as you need, allowing for complex workflows that cater to your unique needs.
Integration: Actions can integrate with various applications, enabling seamless data handling and processing.
With this understanding, you’ll be ready to craft your prompt for ChatGPT and save the generated content in a way that suits your workflow!

🛠 Integrating ChatGPT: Crafting Your Prompt
Now we’re getting to the fun part—integrating ChatGPT! This is where you’ll craft a prompt that tells the AI exactly what you need. A well-structured prompt is crucial for getting the best results. Let’s dive into how to do this effectively!
Your prompt should be clear, concise, and specific. The better your prompt, the better your output. In this instance, we want ChatGPT to generate five compelling email subject lines. Here’s how to set it up:
Steps to Craft Your Prompt
Choose the Right Model: Select GPT-4 for optimal results.
Define Your Task: Clearly state what you want ChatGPT to do. For example, "Generate five email subject lines for a YouTube video announcement."
Incorporate Input: Use the content from the previous step as context for your prompt. This ensures relevance and accuracy.
By following these steps, you’ll create a prompt that not only meets your needs but also leverages the full potential of ChatGPT!

💾 Saving the Results: Where to Store Generated Content
After generating those catchy subject lines, the next step is to save the results. You want to ensure that your hard work doesn’t go to waste, right? Here’s how you can effectively store your generated content.
In our automation, we'll save the output to a designated folder in Dropbox. This way, you can access it anytime without hassle. Let’s break down the saving process:
How to Save Your Generated Content
Select Your Storage App: Choose Dropbox as your storage solution.
Define File Name and Content: Create a meaningful file name that reflects the content, like "original_filename_auto_subject.txt."
Choose the Folder: Direct the output to the "subject lines" folder you set up earlier.
By following these steps, you'll have an organized way to keep track of all your generated content, making future reference a breeze!

🚀 Final Steps: Publishing Your Automation
Congratulations! You’re almost at the finish line. After setting up your trigger and actions, the last step is to publish your zap. This makes your automation live and ready to work for you 24/7. Let’s wrap this up!
Publishing your automation is straightforward. Just click the "Publish" button in Zapier, and voila! Your zap is now active. It will automatically run every time the trigger condition is met.
What Happens After Publishing?
Continuous Operation: Your zap will run in the background, processing tasks as they arise.
Monitoring: Keep an eye on your zap’s performance in the dashboard to ensure everything is running smoothly.
Adjustments: Don’t hesitate to tweak your actions or prompts as needed for improved results.
With your automation live, you can now focus on what you do best while the system handles the repetitive tasks.

🔧 Customization and Future Automations
Now that you’ve set up your first automation, the sky's the limit! Customization is key to making your workflows as efficient as possible. Here’s how to take your automation game to the next level.
Zapier allows you to choose from thousands of apps, giving you the flexibility to create unique automations tailored to your needs. Here are some ideas for future projects:
Ideas for Future Automations
Social Media Posts: Automatically post updates whenever you publish new content.
Lead Generation: Capture leads from forms and send them directly to your CRM.
Customer Follow-ups: Set reminders for follow-up emails based on customer interactions.
By exploring these ideas, you can continuously enhance your productivity and streamline your workflows! Remember, automation is all about working smarter, not harder.

